Note: At the time of writing, Rust integer division on AVR is broken. Check out this issue against the Rust repo for the latest status.
I had time, an interest in sensors, and two Arduinos sitting under my bed so I thought I’d take a whack at running Rust on an Arduino to gather some temperature and pressure data.
I’ve spent much of my career working on web and cloud technologies - Java, C#, JS/TS. Its possible that things in this article would be flagged as misleading or incorrect to an embedded systems audience, but hey the code mostly worked 🤷.
Hardware & Toolchain
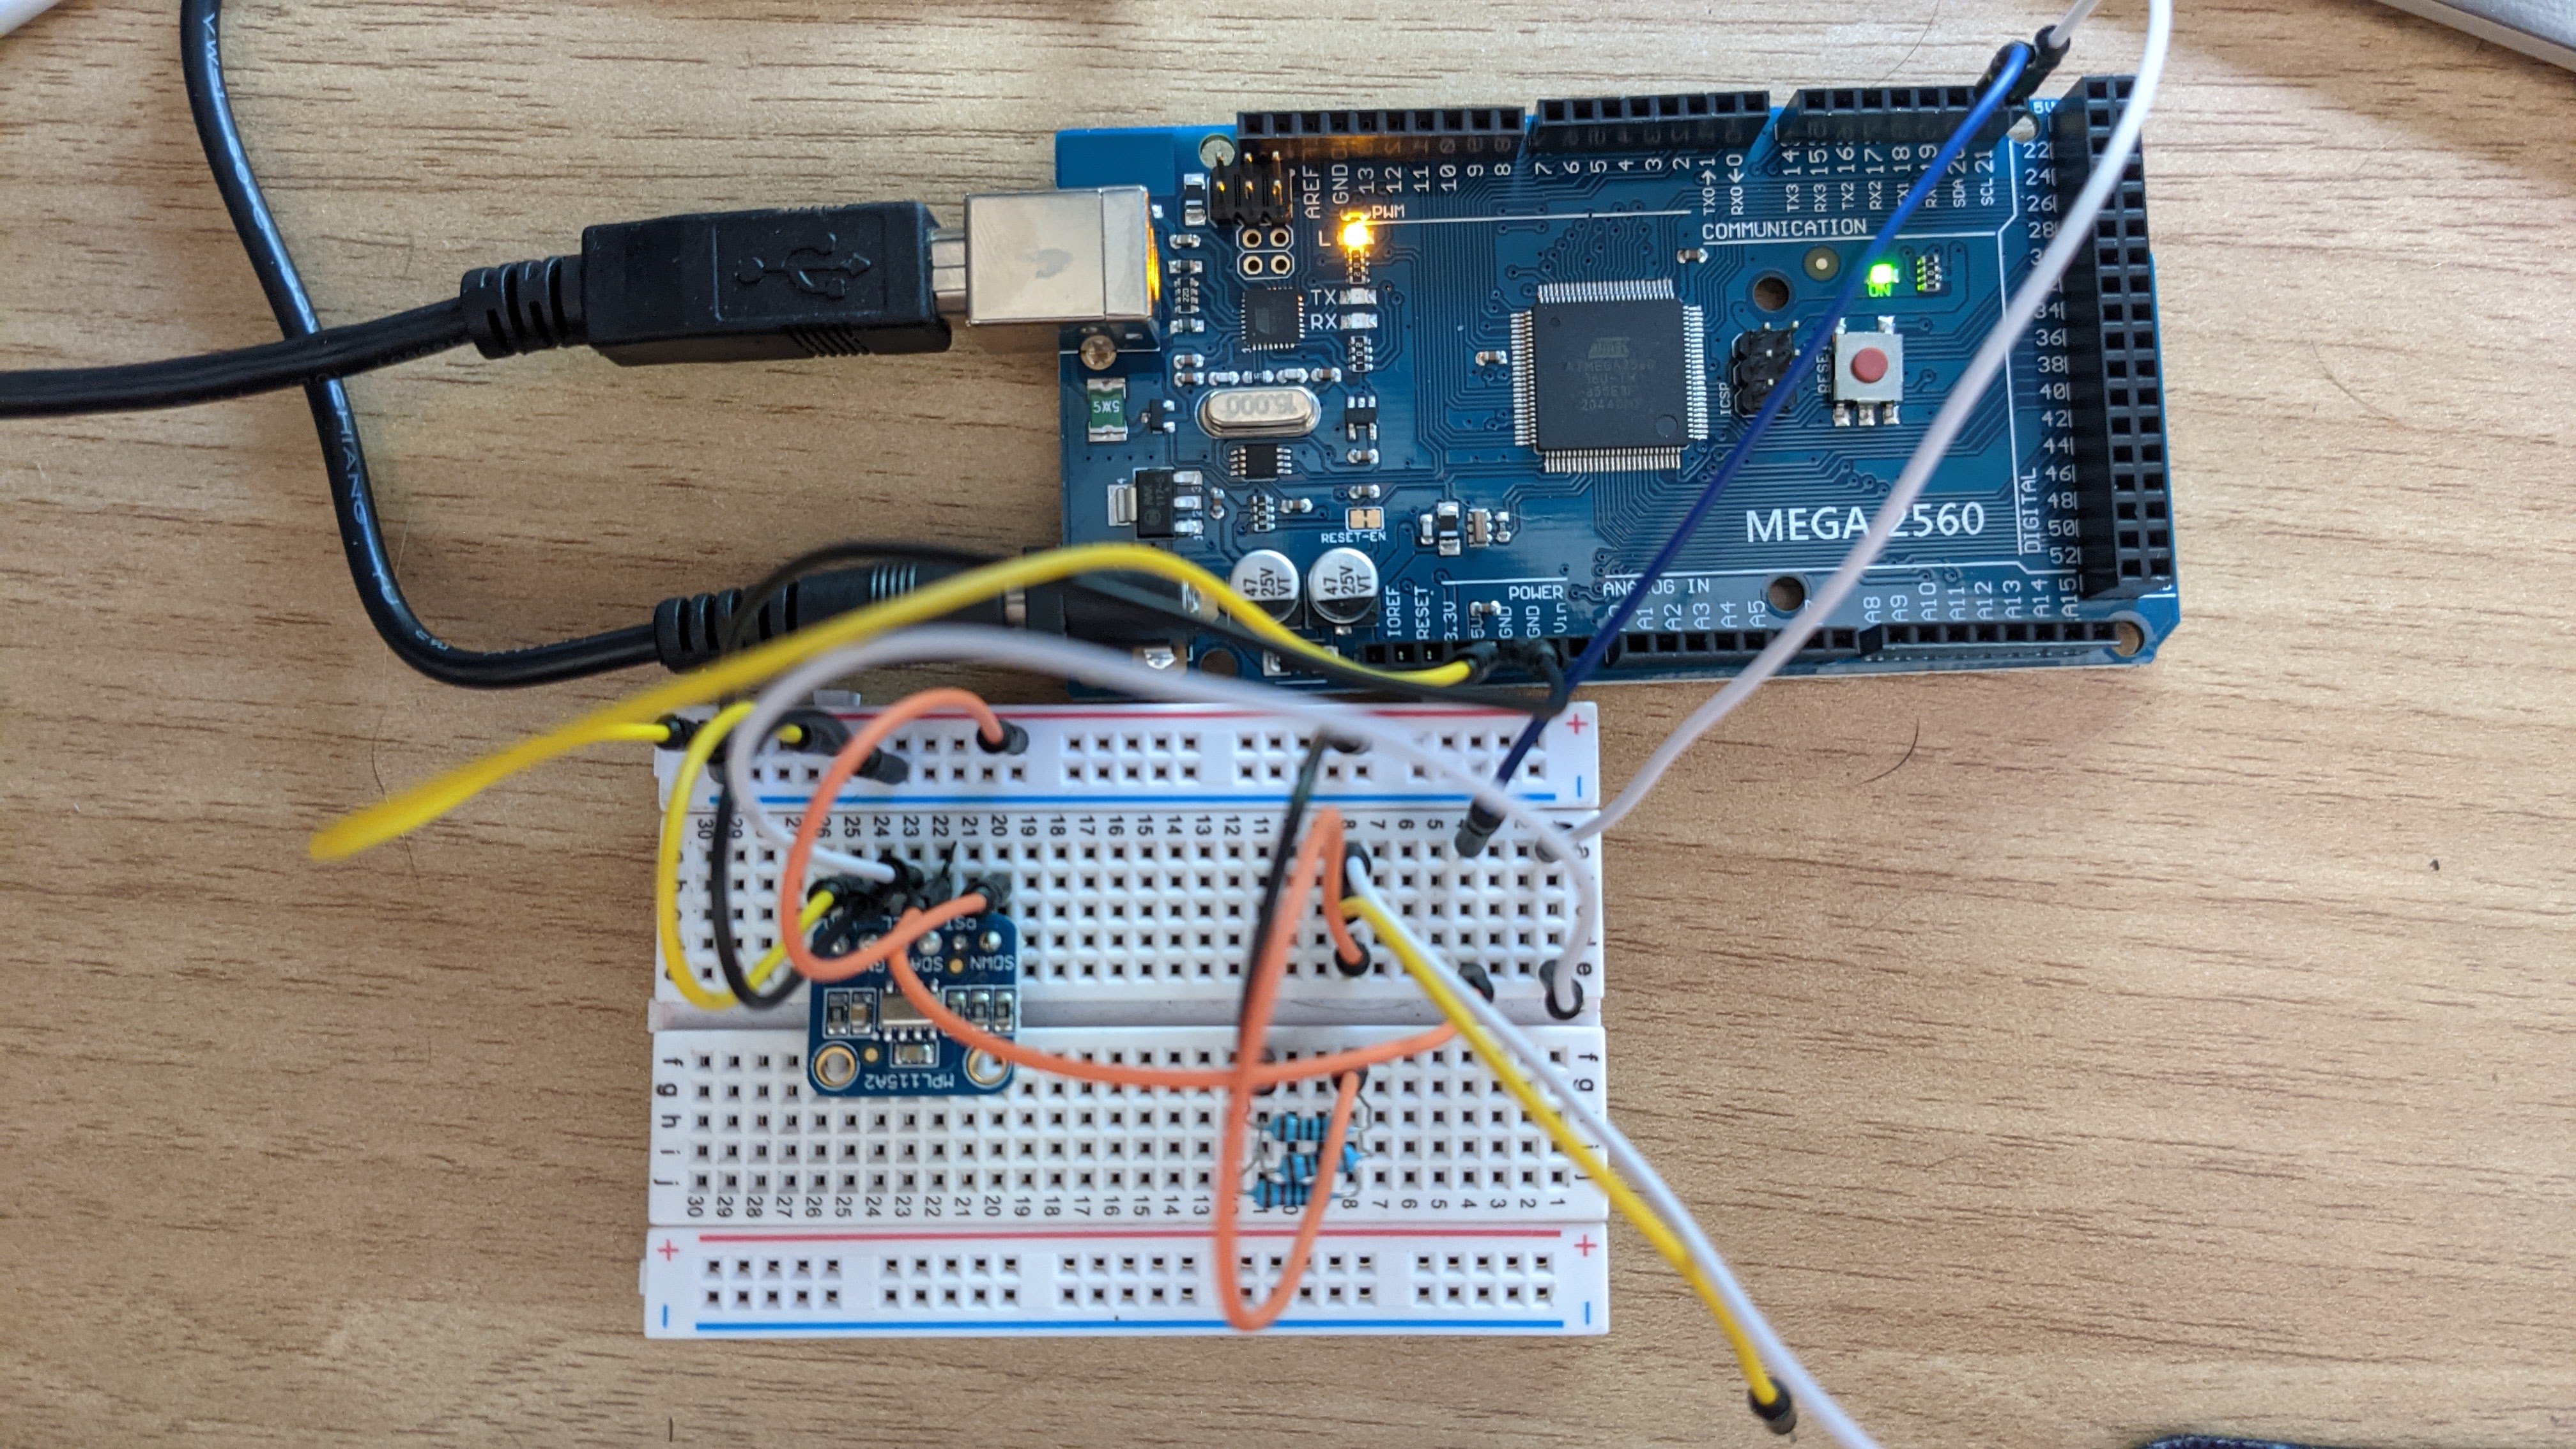
I’ve got the following hardware:
- Arduino Mega2560 w/ an Atmega2560 which has an 8-bit AVR architecture.
- An MPL115A2 temperature and pressure sensor with an I2C interface.
- Wires + breadboard from an ‘Open source electronics starter kit’ that I picked up many years ago.
I’m working on a Ubuntu 20.04 Dell XPS 15 from 2017 and editing with VSCode.
Rust project + tools
AVR on Rust is pretty fresh project. While googling you’ll come across avr-rust, a fork of Rust that adds AVR support. This fork was merged into the official Rust repo in July 2020 so it’s theoretically no longer needed.
Many of the Rust + Arduino/AVR tools that I used are built by Rahix. His tooling made it pretty easy for someone who knows little about embedded software to at least get moving.
Rahix maintains the avr-hal-template project that will generate a project that ‘should just work’ for almost any Arduino board.
$ cargo install cargo-generate
$ cargo install ravedude
$ cargo generate --git https://github.com/Rahix/avr-hal-template.git
AVR project key points
Build targets
If you check out .cargo/config.toml you’ll find a JSON file as build target.
[build]
target = "avr-specs/avr-atmega2560.json"
I was surprised by this level of flexibility built right into Rust. Allowing a JSON file to provide an architecture definition drastically improves the flexibility of the language, allowing anyone to target nearly anything. The RFC for adding this functionality can be found here.
My favorite part of this template is the avr-specs directory that provides specifications for all the arduino boards. My understanding of how this works stops here because my eyes glaze over when I read about linkers, data layouts, and llvm. Knowing that some engineers need to think about memory layouts really trivializes all those times I’ve complained about webpack being complicated.
Rust toolchain
The template includes a rust-toolchain.toml at the root of the repo. Inside, a Rust build is specified under the channel key:
[toolchain]
channel = "nightly-2021-01-07"
components = [ "rust-src" ]
profile = "minimal"
You’ll only find AVR support in the Rust nightly builds, its not available in the stable or beta builds at the time of writing. I played around with this any time I hit what I thought was a potential bug. I never found a build better than nightly=2021-01-07 though. The newer versions were producing errors from the compiler-builtins package related to a breakage somewhere around AVR support.
Using Rust with AVR
The project template drops in a src/main.rs file to get you started. If you’ve written C or another C-like language it’ll look familiar.
#![no_std]
#![no_main]

use panic_halt as _;

#[arduino_hal::entry]
fn main() -> ! {

    let dp = arduino_hal::Peripherals::take().unwrap();
    let pins = arduino_hal::pins!(dp);

    let mut led = pins.d13.into_output();
    loop {
        led.toggle();
        arduino_hal::delay_ms(1000);
    }
}
This code uses the arduino-hal package - hal being Hardware Abstraction Layer which maps memory locations to useful constants and structs - to toggle an LED on the arduino every few seconds.
The API provided by arduino-hal map perfectly to the official Arduino C++ libraries, but I was able to find nearly everything I needed by browsing through the source of the modules it provides.
A few gotchas that I should have expected from the start or didn’t understand until I did some googling:
No standard lib (#![no_std])
Embedded systems don’t have access to the rust standard lib like an OS would. This made sense theoretically, but it took time for the implications to sink in:
- You can’t use any rust crate in your project that relies on
std - You’ll be missing standard math functions like
f32::floorori16::powi. Themicromathcrate is an embedded-centric alternative that I came across. - String operations get tricky. My understanding is that dynamically resizing
Stringstruct is part ofstdso you’ll only have access tostrwhich proved to be tricky to use with rust’s memory safety system.
Rust memory ownership model + embedded systems
A key feature of Rust, and one I didn’t fully appreciate because I haven’t written garbage collector-less code since college, is its ownership system.
The TL;DR is that Rust ownership gives you guaranteed memory safety at compile time. It helps eliminate an entire class of memory management related bugs, while not requiring the developer to alloc/dealloc. I’m a huge fan of static typed languages for their ability to offload cognitive effort from the user and ownership is a similarly powerful way to do that around memory management. You can checkout the Rust docs to learn more.
In an embedded world, I’ve gotten the feeling that it’s necessary to sidestep rust ownership every so often. There are some embedded operations that I don’t think can be made memory safe like accessing peripherals through specific memory addresses.
Using or seeing the Rust unsafe keyword for specific operations made me a little queasy; I felt like I was doing something dirty. I’ve begun to accept its necessity and have tried to keep instances of unsafe isolated.
Peripherals can be accessed once
The HAL lib nicely provides access to things on Arduino board like pins, LEDs, and the serial bus. For easy access to Peripheral constants, I started out by copying around this line into a handful of files:
let dp = arduino_hal::Peripherals::take().unwrap();
Based on some sophisticated print statement debugging, I determined that my program would crash when it hit the second call to arduino_hal::Peripherals::take(). When I limited myself to a single call to arduino_hal::Peripherals::take() it stopped crashing.
If you dig into the source of that function, you’ll find that a static global variable DEVICE_PERIPHERALS is initialized set to false and when Peripherals::take is called, it only returns the struct when false, otherwise it returns Option::None. The first line of Peripherals::steal is DEVICE_PERIPHERALS = true.
#[cfg(feature = "atmega2560")]
impl atmega2560::Peripherals {
    /// Returns all the peripherals *once*
    #[inline]
    pub fn take() -> Option<Self> {
        crate::interrupt::free(|_| {
            if unsafe { DEVICE_PERIPHERALS } {
                None
            } else {
                Some(unsafe { atmega2560::Peripherals::steal() })
            }
        })
    }
}
The function attempts to guarantee that there is a single instance of the struct available at runtime. My best guess is that its supposed to prevent inappropriate access to the underlying peripheral pins.
Arduino with I2C
Part of my endeavor has been to read data from the MPL115A2 temperature and pressure sensor. The sensor uses the I2C protocol
Learning more about I2C to implement this was fun. For those that know nothing about it, I found it similar to a packet moving over a typical network.
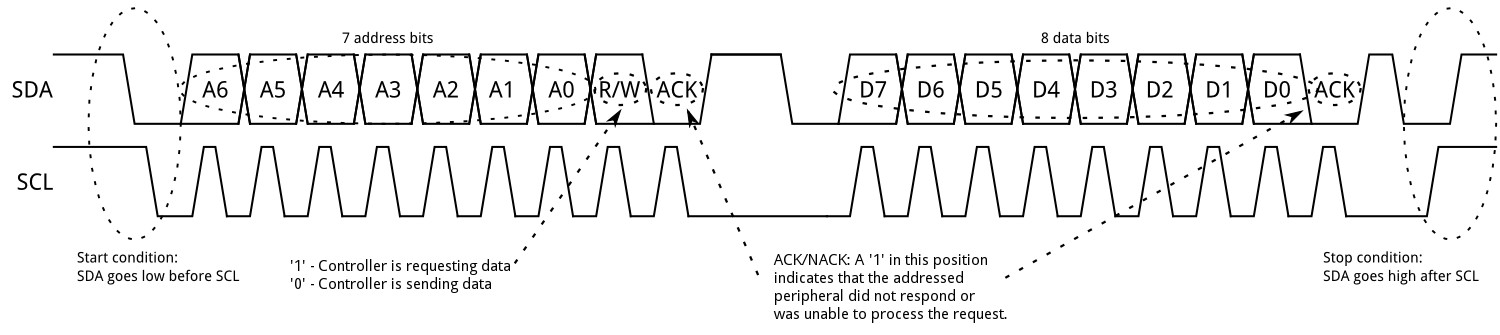
There are primary devices and secondary devices in I2C. Each I2C message contains a start condition, a device address, data frames, and a stop. The inclusion of a device address means that multiple devices can use the same circuit to communicate. Each device knows its own address, and if the address in the message doesn’t match then the device can ignore the message.
To coordinate the single data circuit (SDA) for multiple devices, each device is also attached to a shared clock circuit (SCL).
Initializing an I2C connection with the MPL115A2 was straightforward. I chose to create a single I2C struct and provide that to the MPL115A2 specific functions. If I were to add more sensors I could reuse the single instance.
use arduino_hal::I2c;

let mut i2c = I2c::new(
    dp.TWI,
    pins.d20.into_pull_up_input(),
    pins.d21.into_pull_up_input(),
    50000,
);
To operate the MPL sensor, I found the Adafruit C++ driver and decided to port that to Rust.
Disclaimer: I never verified that this code fully works. After several hours of print statement debugging I believe the problems are due to the integer division bug noted at the top of the post
The first step is to tell the sensor to read some base values that would be used in further readings for the sensors. I didn’t entirely understand the reasoning, but it was simple.
use arduino_hal;
use arduino_hal::I2c;
use embedded_hal::blocking::i2c::Write;
use embedded_hal::blocking::i2c::WriteRead;

const MPL115A2_DEFAULT_ADDRESS: u8 = 0x60; // < I2C address **/
const MPL115A2_REGISTER_PRESSURE_MSB: u8 = 0x00; // < 10-bit Pressure ADC output value MSB **/
const MPL115A2_REGISTER_A0_COEFF_MSB: u8 = 0x04; // < a0 coefficient MSB **/
const MPL115A2_REGISTER_STARTCONVERSION: u8 = 0x12; // < Start Pressure and Temperature

pub fn read_coefficients(i2c: &mut I2c) -> Result<MPL115A2Coefficients, arduino_hal::i2c::Error> {
    let mut buffer: [u8; 8] = [0; 8];

    i2c.write_read(
        MPL115A2_DEFAULT_ADDRESS,
        &[MPL115A2_REGISTER_A0_COEFF_MSB],
        &mut buffer,
    )?;

    let a0 = i16::from_be_bytes([buffer[0], buffer[1]]) as f32 / 8.0;
    let b1 = i16::from_be_bytes([buffer[2], buffer[3]]) as f32 / 8192.0;
    let b2 = i16::from_be_bytes([buffer[4], buffer[5]]) as f32 / 16384.0;
    let c12 = i16::from_be_bytes([buffer[4], buffer[5]]) as f32 / 4194304.0;

    return Ok(MPL115A2Coefficients{
        a0,
        b1,
        b2,
        c12
    });
}
You’ll notice the i2c.write_read function accepts a device address. That will be used in the I2C message so the sensor knows to respond to the message. This code was largely copied from the Adafruit driver so I don’t have much to say.
Below is the block to read pressure and temperature from the sensor, once again ported from the C++ driver. Reading data requires 3 steps:
- A ‘Start conversion’ command is issued to the sensor.
- We wait 5ms for the sensor to take a sample and write it to its internal registers.
- We issue a command for the sensor to send us the data in its registers then convert that data based on the MPL115A2 datasheet specifications.
pub fn get_pressure_and_temp(
    coeff: MPL115A2Coefficients,
    i2c: &mut I2c,
) -> Result<(f32, f32), arduino_hal::i2c::Error> {
    let pressure: u16;
    let temp: u16;
    let pressure_comp: f32;
    let mut buffer: [u8; 4] = [0; 4];

    i2c.write(MPL115A2_DEFAULT_ADDRESS, &[MPL115A2_REGISTER_STARTCONVERSION, 0])?;

    // Wait for the conversion to complete (3ms max)
    arduino_hal::delay_ms(5);

    i2c.write_read(MPL115A2_DEFAULT_ADDRESS, &[MPL115A2_REGISTER_PRESSURE_MSB], &mut buffer)?;

    pressure = (((buffer[0] as u16) << 8) | (buffer[1] as u16)) >> 6;
    temp = (((buffer[2] as u16) << 8) | (buffer[3] as u16)) >> 6;

    // See datasheet p.6 for evaluation sequence
    pressure_comp = coeff.a0
        + (coeff.b1 + coeff.c12 * (temp as f32)) * (pressure as f32)
        + coeff.b2 * (temp as f32);

    // Return pressure and temperature as floating point values
    return Ok((
        ((65.0 / 1023.0) * pressure_comp) + 50.0, //kPa
        ((temp as f32) - 498.0) / -5.35 + 25.0,   // C
    ));
}
Reporting results
I’ve had the Arduino connected to my machine via USB throughout this process. The ravedude package that comes as part of the project template allows the cargo run command to flash the Arduino then begin reading off the /dev/ttyACM0 serial connection. Having the arduino write to its serial connection means the output will appear in your terminal.
Writing to the serial connection is straightforward. You start by creating a USART struct with the default_serial! macro included in arudino_hal.
The ufmt crate seems to be the standard alternative to the functionality that the Rust std::fmt lib provides. It provides the uwriteln and uwrite macros.
let mut serial = arduino_hal::default_serial!(dp, pins, 57600);
uwriteln!(&mut serial, "Hello, World!").unwrap()
To perform string interpolation, you can use the {} syntax like so:
uwriteln!(&mut serial, "Hello, World! {}, {}, {}", 1, 2, 3).unwrap()
ufmt provides formatters for each integer type, but does not provide float formatter. I found the ufmt_float package to get that functionality. The package is a tad jank - its source repo has been deleted from GitHub - but it seems that it would work assuming that AVR integer division is working.
Closing
I’m fairly convinced that Rust is amazing. The hype is truly real. The features provided in its tooling and its developer ergonomics are all next-level.
I have no desire to use it for something like a web application though. I’d take a garbage collected language any day. Needing to deal with memory ownership would end up being too slow to develop with efficiently. Garbage collectors have become less and less relevant in the Java ecosystem due to newer implementations like ZGC, and I’ve never heard many gripes about GCs in Go or other ‘hot’ languages.
If I had a need to write more memory-sensitive software, Rust seems like a great fit. Networking, OS, language-implementation.
I’m bummed that there is a critical bug open for AVR still. After some research, it seems that most serious embedded engineers are working off ARM microcontrollers anyway, so I have a SMT32 Nucleo-32 with a Cortex-M4 on its way. The Cortex chips seem to be a embedded Rust favorite so we’ll see where I can get with that chip.